Indigo and Fresh Leaf Dyeing
Growing Japanese indigo (Persicaria tinctoria) is really easy. They are pretty hardy plants and so far, the animals don’t like to chew on them. Every spring, there will be a few bites taken out of a couple of leaves, and then nothing. I attribute these to young deer who don’t know any better. After they’ve had a few bites, they realize they’re not interested and move along to the hastas. Slugs and snails can be a real problem for the young plants. Grateful I haven’t had any problems with these critters (knocking on wood).

Each year I have three 10-foot rows of indigo. Rather than plant them in a straight line, I stagger them so that I can get more plants in. I end up with about 11-13 plants per row. Since I started no dig gardening (mentioned in the previous post), I’ve always got a layer of straw on top which helps keep the moisture in and helps a bit with weed control. The weeds that make it through are easy to pluck out because the soil is soft and not compacted.

If it’s really hot and dry, then I’ll water them about once a week, but I try to depend on the rain as much as I can. These plants are nitrogen hogs! I feed them once a week (when I’m on top of things) with some fish emulsion, which is super stinky. This year I bought some blood meal, which is dry and granular. Both are organic options for feeding plants that need a lot of nitrogen.

My indigo would grow okay without feeding, but it doesn’t produce as much of the blue when it’s hungry for the stuff. Once a week is plenty good for the indigo. And in reality, I probably get closer to every other week.
At about 6 weeks after transplant, the indigo is usually ready for its first “haircut” (aka harvest). When things align, I can sometimes eek out 3 harvests and still get seeds for next year. I can always count on 2 harvests (assuming I start the plants indoors in March).

Above: beginnings of harvesting 2 rows. I use a hand-held sickle to cut the plants a couple inches above the ground. The plants will come back bigger and fuller and ready for cutting again in 4-6 weeks.

The extraction process (in next week’s blog) is pretty involved. You kinda really gotta want it if you grow indigo for pigment extractions to use in a vat. Fortunately, there are a few fun things we can do with fresh indigo leaves.
Dyeing silk with fresh leaves

The first thing I learned to do with indigo was dye silk with freshly picked leaves. Morning is the best time to do this because it’s cooler and the plants are more hydrated, and maybe even still have some dew on them. When I harvest the leaves, I put them in cold water to rinse them and keep them hydrated. The process is easy: fill a blender about half full with fresh leaves, add ice cold water (with or without ice) to cover by maybe a half inch or so, cover the blender and start blending.

Add leaves through the top hole and water if needed) and blend the living daylights of it. Liquefy is the highest setting on my blender and I spend all my time on that setting!
Pro tip: you can always get used blenders at the thrift shop! Technically, there’s nothing poisonous in the indigo, so you could use your own blender, but I prefer to keep all my dye equipment separate from my food prep equipment. It’s just good practice.
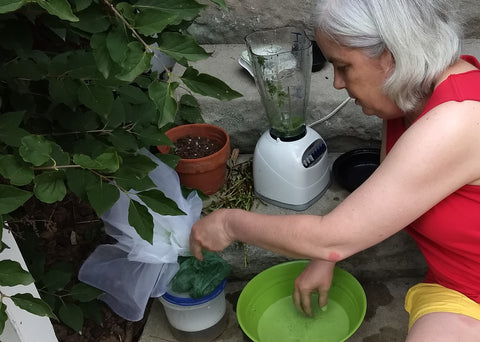
Once sufficiently blended, strain the contents through some cloth (organza works great), add your pre-wetted silk and soak for 5 or 10 minutes. You can repeat the process to get darker colors, but I really love the turquoise color you can get from a single swim in the green liquid. This technique really works best on silk. You can get some color on wool or cotton, but it is not strong, and I don’t know if it’s colorfast.
Using salt and elbow grease...

Kneading your fiber into fresh indigo leaves with salt can produce some surprising results. I particularly like the effect I can get on wool with this technique. For me, these are some perfect textures for winter scenes, snow, sky, sun-dappled lake. You can get more uniform color, but I really prefer the texture.

This process will work with any natural fiber (linen napkin in the middle, bottom row), though I think it would be a bit rough on silk. Add fresh leaves to a bowl, sprinkle with some salt (I use kosher or sea salt), and start kneading. The salt breaks down the cell walls allowing the blue to come out. After I’ve kneaded a few minutes just to get the process going, I add my wetted-out fiber and knead until I reach a color and texture I like. The kneading grinds the dye into the fabric. If necessary, I’ll add more leaves and a little more salt as I go. It’s usually necessary! The wool takes me about 45-60 minutes of kneading to get the color I want. Definitely a strengthening exercise for the hands!
Okay, that’s all for today. Next time I’ll share my harvesting and the extraction process I use for getting indigo pigment I can use in a vat.
Until then, I wish you abundant love and colors!
Leave a comment